Authentication in ASP.NET Web Services
Silan Liu,
Feb. 2004.
Content:
Windows
Integrated Authentication
Simple
approach: to use the default ASP.NET authentiction
Advanced
approach: doing everything yourself
Customize Authentication with HTTP Module
Introduction
Authentication is a process of finding out the user’s identity. In ASP.NET, the found information is supposed to be stored in HttpContext.User.Identity. This process can be done either by the framework or by yourself, for example, in a HTTP module. All you need to do is to assign values to the properties of HttpContext.User.Identity. If they are null, User.Identity.IsAuthenticated returns false. If they are assigned, no matter what value they have, User.Identity.IsAuthenticated returns true.
Let’s look at one example.
The following web service is in a virtual directory with anonymous access:
[WebMethod]
public string HelloWorld()
{
/*string [] astrRoles = {"Whatever"};
GenericIdentity i = new GenericIdentity("Whoever");
Context.User = new GenericPrincipal(i, astrRoles);*/
return "User name: " + Context.User.Identity.Name +
"\nAuthenticated: " + Context.User.Identity.IsAuthenticated.ToString() +
"\nIn \"Whatever\" role: " + Context.User.IsInRole("Whatever").ToString();
}
Client:
[STAThread]
static void
{
Client.WSAuthen.Service1 service = new Client.WSAuthen.Service1();
Console.WriteLine(service.HelloWorld());
Console.ReadLine();
}
The output will be:
User name:
Authenticated: False
In "Whatever" role: False
This is because the ASP.NET process was running under anonymous access and no authentication has been done. After you uncomment the commented code in the web method, the output will be:
User name: Whoever
Authenticated: True
In "Whatever" role: True
Note that the user “Whoever” with a role “Whatever” are neither provided by the client nor stored in the user account of the server.
Windows Authentication
In Windows authentication, application developers don’t need to store and check the user name and passwords. All they need to do is to go to IIS and choose the authentication type. But it requires some work to be done outside the application – corresponding user accounts and groups must be configured on the server. In comparison, in forms authentication, you need to do everything yourself within the application, including prompting user for credentials, storing and checking credentials. It can mean both more work and more flexibility.
To select the authentication method of a specific virtual directory in XP, go to “Control Panel” | “Administrative tools” | “Internet Information Services” | “Web sites” | “Default web sites” | right-click the web site | “Properties” | “Directory security” tab page | Click “Edit” button in “Anonymous access and authentication control” group | “Authentication Methods” page. To configure it not to use Windows authentication, tick the “Anonymous Access” tickbox in “Authentication Methods” page. When you do it, make sure “Integrated windows authentication” is also ticked. Then this web site can be accessed by anyone without any credentials. This way you can use other authentication methods such as forms authentication.
When configured to use anonymous access, IIS will use the user account displayed below the “Anynymous access” tickbox (IUSR_COMPUTERNAME) for all users. This account was created when IIS was installed.
When IIS is configured to use Windows authentication, it will return a “HTTP status 401 – Access Denied” message if there isn’t such a user or the user doesn’t have the required previllege.
Basic Authentication
If we are accessing the web form or web service using basic authentication through web browser, the web browser will pop up a dialog box to ask for user name and password. If the client is a web service proxy, it can not pop up a dialog to collect the user/password credentials, so you have to create a credential object containing such information, and assign it to the proxy’s Credentials property. User name and password are sent in encoded text, which is not very secure.
Now let’s look at a web service using basic authentication.
The web service simply returns the information of the user’s credential:
[WebMethod]
public string
HelloWorld()
{
return
Context.User.Identity.Name + ", Authen. type:
" + Context.User.Identity.AuthenticationType +
",
Authenticated: " + Context.User.Identity.IsAuthenticated.ToString()
+ ", " +
DateTime.Now.Minute + ":".ToString() + DateTime.Now.Second;
}
The user interface is as below:
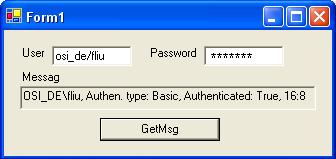
When user clicks the “GetMsg” button, a NetworkCredential is created and assigned to the proxy’s Credentials property, then the web method is invoked.
private void btnGetMsg_Click(object
sender, System.EventArgs e)
{
Client.localhost.Service1
service = new Client.localhost.Service1();
service.Credentials = new System.Net.NetworkCredential(tbUserName.Text,
tbPassword.Text, "");
tbMsg.Text =
service.HelloWorld();
service.Credentials = null;
}
If you don’t have correct user name and password, you will get a “HTTP status 401 – Access Denied” message, of course. But once you get it right, you can change the user name or passwords to be anything, and you will still get an updated message. The minute-second time stamp at the tail of the message proves this.
The domain name will always be “”.
Digest Authentication
Digest authentication is the same as basic authentication except that the credentials are passed as one-way hashed. It requires that the Windows server use Active Directory to store all Windows user account database information, or has access to the Active Directory to look up the user account information. Because of the use of Active Directory, it is more scalable.
The same sample code that we used for basic authentication will work for digest authentication.
Windows Integrated Authentication
Windows integrated authentication is also similar to basic authentication but uses more sophisticated hashing algorithm. It is mainly used on Intranet, because it requires extra TCP port to be opened on the firewall, and doesn’t work with proxy servers.
If your “users” user group contains “Domain Users”, then all domain users can access your web page through integrated authentication without the user/password dialog being popped up. If you remove “Domain Users” from the “users” group, then a dialog box will be popped up at the client side, asking for user name, password and domain. Only the specific users that has privileges higher than the “users” group will be able to access your web form or service.
The same sample code that we used for basic authentication will work for Windows integrated authentication.
Forms Authentication
Windows authentications are all performed by the IIS. When a web service or web form get invoked, the authentication has been already passed.
In forms authentication, IIS does not perform authentication – you should set it to use anonymous access. The called web method itself is responsible to initiate authentication. Typically, the “login” web method checks the user credentials against stored ones, if there is a match, it creates an authentication ticket, encrypt it, assigns it to a cookie (can be persistent or non-persistent), and inserts the cookie into the client, so that following requests from the client can be authenticated with the cookie.
The creation of the ticket and cookie and the insertion of the cookie can all be done in one method call: FormsAuthentication.SetAuthCookie, only it does not store user roles in the ticket.
ASP.NET retrieves the name of the cookie from the web.config file:
<authentication mode="Forms">
<forms name="MyAuthenCookie"
loginUrl="service1.asmx" protection="All" timeout="60" path="/" />
</authentication>
“protection” can be “All”, “Encryption”, “Validation” and “None”. If this entry is missing, ASP.NET will use a default cookie name, such as “.ASPXAUTH”.
When a new request comes, ASP.NET knows from the web.config file that it is using forms authentication mode, so it retrieves the cookie name from the file (or use the default name), then tries to retrieve the cookie from the request. If the cookie does not exist, it redirects the request to the login page. If it exists, ASP.NET decrypts the ticket from the cookie, retrieves the user name from the ticket, and authenticates with this user name. This is the default forms authentication behaviour of ASP.NET. It does not retrieve the user roles stored in the ticket.
If this default authentication is what you want, all you need to do is to call the FormsAuthentication.SetAuthCookie at initial login, then check the Context.User.Identity.IsAuthenticated flag to see if user is authenticated. This is the simple approach. if you want to authorize by user roles, you have to create authentication ticket and cookie and insert it into the client yourself, and authenticate following requests yourself. Following sections provide sample code for both approaches.
If the application only uses one pair of user name/password, you can store them in the web.config file:
<credentials
passwordFormat=”SHA1”>
<user name=”silanliu”
password=”UH57RH8YGHELI8HW2R37HFGG28JSH6HBV8C7”/>
</credentials>
then you can call FormsAuthentication.Authenticate to automatically authenticate the name/password pair against the credentials stored in the web.config file.
Simple approach: to use the default ASP.NET authentiction
Web service:
private string AuthenticateUser(string strUser, string strPwd)
{
if (strUser == "silan" && strPwd == "silan")
return "silan's role";
else if (strUser == "yang" && strPwd == "yang")
return "yang's role";
else
return null;
}
[WebMethod]
public bool Login(string strUser, string strPwd)
{
string strRole = AuthenticateUser(strUser, strPwd);
if (strRole != null)
{
// Issue the authentication key to the client
FormsAuthentication.SetAuthCookie(strUser, false);
return true;
}
else
return false;
}
[WebMethod]
public void LogOut()
{
// Deprive client of the authentication key
FormsAuthentication.SignOut();
}
[WebMethod]
public string GetMsg()
{
string s = "Authenticated: " + Context.User.Identity.IsAuthenticated.ToString() +
"\nFormsCookieName: " + FormsAuthentication.FormsCookieName +
"\nUser name: " + Context.User.Identity.Name +
"\nIs in role \"silan's role\": " + Context.User.IsInRole("silan's role").ToString() +
"\nIs in role \"yang's role\": " + Context.User.IsInRole("yang's role").ToString();
FormsAuthentication.SignOut();
return s;
}
The above Login method does the same thing as the following one:
public bool Login(string strUser, string strPwd)
{
string strRole = AuthenticateUser(strUser, strPwd);
if (strRole != null)
{
FormsAuthenticationTicket ticket = new FormsAuthenticationTicket(
1, // version
strUser, //
user name
DateTime.Now, //
create time
DateTime.Now.AddSeconds(30), // expire time
false, // persistent
""); // user data
string strEncryptedTicket = FormsAuthentication.Encrypt(ticket);
HttpCookie cookie = new HttpCookie(FormsAuthentication.FormsCookieName, strEncryptedTicket);
Context.Response.Cookies.Add(cookie);
return true;
}
else
return false;
}
The client:
static void Main(string[] args)
{
Console.WriteLine("Please key in user name:");
string strUser = Console.ReadLine();
Service1 s = new Service1();
s.CookieContainer = new System.Net.CookieContainer();
s.Login(strUser, strUser);
Console.WriteLine(s.GetMsg());
Console.ReadLine();
}
If the cookie name entry is present in the web.config file, and you type in
“silan”, the output will be:
Please key in user name:
silan
Authenticated: True
FormsCookieName: MyAuthenCookie
User name: silan
Is in role "silan's role": False
Is in role "yang's role": False
If the cookie name entry is missing and you type in “yang”, the output will be:
Please key in user name:
yang
Authenticated: True
FormsCookieName: .ASPXAUTH
User name: silan
Is in role "silan's role": False
Is in role "yang's role": False
If you type in a name other than “silan” or “yang”, the output will be:
Please key in user name:
blar
Authenticated: false
FormsCookieName: .ASPXAUTH
User name:
Is in role "silan's role": False
Is in role "yang's role": False
Advanced approach: doing everything yourself
Web service:
private string AuthenticateUser(string strUser, string strPwd)
{
if (strUser == "silan" && strPwd == "password")
return "silan's role";
else if (strUser == "yang" && strPwd == "password")
return "yang's role";
else
return null;
}
[WebMethod]
public bool Login(string strUser, string strPwd)
{
string strRole = AuthenticateUser(strUser, strPwd);
if (strRole != null)
{
FormsAuthenticationTicket ticket = new FormsAuthenticationTicket(
1, // version
strUser, //
user name
DateTime.Now, //
create time
DateTime.Now.AddSeconds(30), // expire time
false, // persistent
strRole); //
user data
string strEncryptedTicket = FormsAuthentication.Encrypt(ticket);
HttpCookie cookie = new HttpCookie(FormsAuthentication.FormsCookieName, strEncryptedTicket);
Context.Response.Cookies.Add(cookie);
return true;
}
else
return false;
}
[WebMethod]
public void LogOut()
{
// Deprive client of the authentication key
FormsAuthentication.SignOut();
}
[WebMethod]
public string GetMsg()
{
string s = "Authenticated: " + Context.User.Identity.IsAuthenticated.ToString() +
"\nFormsCookieName: " + FormsAuthentication.FormsCookieName +
"\nUser name: " + Context.User.Identity.Name +
"\nIs in role \"silan's role\": " + Context.User.IsInRole("silan's role").ToString() +
"\nIs in role \"yang's role\": " + Context.User.IsInRole("yang's role").ToString();
FormsAuthentication.SignOut();
return s;
}
In Global.asax, you handle the AuthenticateRequest event in the Application_AuthenticateRequest method, in which you do all the authentication:
protected void Application_AuthenticateRequest(Object sender, EventArgs e)
{
try
{
HttpCookie authenCookie = Context.Request.Cookies.Get(FormsAuthentication.FormsCookieName);
if (authenCookie == null) return;
FormsAuthenticationTicket ticket = FormsAuthentication.Decrypt(authenCookie.Value);
FormsIdentity id = new FormsIdentity(ticket);
string [] astrRoles = ticket.UserData.Split(new char[]{','});
GenericPrincipal principal = new GenericPrincipal(id, astrRoles);
Context.User = principal;
}
catch (Exception ex)
{
System.IO.StreamWriter wr = new System.IO.StreamWriter(Context.Request.MapPath("log.txt"));
wr.WriteLine(ex.Message);
wr.Close();
}
}
Client remains the same.
When you type in “Silan”, the output will be:
Please key in user name:
silan
Authenticated: True
FormsCookieName: .ASPXAUTH
User name: silan
Is in role "silan's role": True
Is in role "yang's role": False
URL Authorization
URL authorization is a service provided by ASP.NET (class URLAuthorizationModule) and does not rely on IIS. It checks the user’s user name, role and verb (GET or POST) contained in the client request. This process is processed after authentication process is done, in whatever way – could be Windows authentication, forms authentication or any other customized authentication. User may have been authenticated (which has a user name) or may not (when the virtual directory is configured to use anonymous access and no authentication is done). All you need to do is to setup the web.config file:
<authorization>
<allow users="Silan,Yang" />
<deny roles="R&D" verb="POST"/>
<!-- <allow users="[comma separated list of
users]"
roles="[comma
separated list of roles]"/>
<deny users="[comma separated list of
users]"
roles="[comma
separated list of roles]"/>
-->
</authorization>
“*” means all users and “?” means anonymous user.
The authorization check is done on a top-down line-by-line sequence. Once the user or role is found, the read will stop. For example, if you have
<allow users="*" />
<deny roles="R&D" />
then R&D people will still be authorized. So the rule is: always put more specific definitions ahead of more generic definitions.
If URL authorization fails, client will get a “HTTP 401: unauthorized” error.
Customize Authentication with HTTP Module
Windows authentications are done by the framework before the web method is accessed. Forms authentication is fully customizable and done in the web method. Now if you want the authentication process to be fully customizable and done before the web method is reached, you can use HTTP modules. For more details about HTTP modules, see my article “Introduction to HTTP Modules”.
Following is an example of customizing authentication with HTTP module. A HTTP module is used to handle the AuthenticateRequest event generated by the framework during request processing. It acquires the SOAP envelope contained in the request, parses it to acquire the user name and passward contained in the custome SOAP header, compares them against hard-coded user name and password. If they are the same, it authenticates the user.
Web service:
namespace NsWSHttpModuleTest
{
public class MySoapHeader : SoapHeader
{
public string UserName;
public string Password;
}
public class Service1 : System.Web.Services.WebService
{
public MySoapHeader mSoapHeader = null;
public Service1()
{
InitializeComponent();
}
[WebMethod]
[SoapHeader("mSoapHeader", Direction = SoapHeaderDirection.InOut)]
public string HelloWorld()
{
return "User name: " + Context.User.Identity.Name +
"\nAuthenticated: " + Context.User.Identity.IsAuthenticated.ToString() +
"\nIn \"Whatever\" role: " + Context.User.IsInRole("Whatever").ToString();
}
}
}
HTTP module:
namespace NsWSHttpModuleTest
{
public class AuthenticateRequestHttpModule : IHttpModule
{
private HttpApplication mHttpApp;
public void Init(HttpApplication httpApp)
{
this.mHttpApp = httpApp;
mHttpApp.AuthenticateRequest += new EventHandler(OnAuthentication);
}
void OnAuthentication(object sender, EventArgs a)
{
HttpContext context = ((HttpApplication)sender).Context;
Stream stream = context.Request.InputStream;
if (((HttpApplication)sender).Context.Request.ServerVariables["HTTP_SOAPACTION"] == null)
return;
long lStreamPosition = stream.Position;
XmlDocument doc = new XmlDocument();
doc.Load(stream);
stream.Position = lStreamPosition;
string strUser = doc.GetElementsByTagName("UserName").Item(0).InnerText;
string strPwd = doc.GetElementsByTagName("Password").Item(0).InnerText;
if (strUser == "silanliu" && strPwd == "thepassword")
{
string [] astrRoles = {"Whatever"};
GenericIdentity i = new GenericIdentity("Whoever");
context.User = new GenericPrincipal(i, astrRoles);
}
}
public void Dispose()
{}
}
}
Corresponding entry in the web.config file:
<?xml version="1.0" encoding="utf-8"
?>
<configuration>
<system.web>
<httpModules>
<add name="AuthenticateRequestHttpModule" type="NsWSHttpModuleTest.AuthenticateRequestHttpModule,
WSHttpModuleTest" />
</httpModules>
</system.web>
</configuration>
Client:
static void
{
Service1 s = new Service1();
MySoapHeader header = new MySoapHeader();
header.UserName = "silanliu";
header.Password = "thepassword";
s.MySoapHeaderValue = header;
Console.WriteLine(s.HelloWorld());
Console.ReadLine();
}
The output will be:
User name: Whoever
Authenticated: True
In "Whatever" role: True
To make the solution more robust, instead of authenticating the user in the HTTP module, you could let it generate an event and put a handler method in the global.asax file.
Impersonation
You may have noticed that after you install the ASP.NET, a new user account “ASPNET” is created with “Administrators” privilege. All the ASP.NET and Web Services processes are run under this user account. If you take away this privilege, ASP.NET and Web Services are no longer able to run.
The process always running under one identity means that you can not give different access privileges to different users, for example, a particular file can only be opened by one particular user.
To let the ASP.NET and Web Service process run under the authenticated user, simply put such an entry in the web.config file:
<system.web>
<identity impersonate="true" />
</system.web>
To let the process of all users impersonate one particular user say “Yang”:
<system.web>
<identity impersonate="true" userName="Yang" password="bar" />
</system.web>
Note that “Yang” must belong to the “Administrators” group.
See following example.
Client side:
Client.sealand.Service1
s = new Client.sealand.Service1();
s.Credentials
= new System.Net.NetworkCredential("Silan", "foo",
"");
textBox.Text
= s.HelloWorld();
Server side:
[WebMethod]
public string
HelloWorld()
{
WindowsPrincipal winPrin = new WindowsPrincipal(WindowsIdentity.GetCurrent());
return "User.Identity.Name = " +
Context.User.Identity.Name + "\r\n" +
"User.Identity.AuthenticationType
= " +
Context.User.Identity.AuthenticationType + "\r\n"
+
"User.Identity.IsAuthenticated
= " +
Context.User.Identity.IsAuthenticated.ToString() + "\r\n"
+
"WindowsPrincipal.Identity.name
= " + winPrin.Identity.Name +
"\r\n" +
"WindowsPrincipal.AuthenticationType
= " + winPrin.Identity.AuthenticationType + "\n\n" +
"File content:\n" + s;
}
When “impersonate” is set to “false” in the web.config file, the returned string is
User.Identity.Name
= SEALAND\Silan
User.Identity.AuthenticationType
= Basic
User.Identity.IsAuthenticated
= True
WindowsPrincipal.Identity.name
= SEALAND\ASPNET
WindowsPrincipal.AuthenticationType
= NTLM
When it is “true”:
User.Identity.Name
= SEALAND\Silan
User.Identity.AuthenticationType
= Basic
User.Identity.IsAuthenticated
= True
WindowsPrincipal.Identity.name
= SEALAND\Silan
WindowsPrincipal.AuthenticationType
= NTLM
When “userName” is set to “Yang”:
User.Identity.Name
= SEALAND\Silan
User.Identity.AuthenticationType
= Basic
User.Identity.IsAuthenticated
= True
WindowsPrincipal.Identity.name
= SEALAND\Yang
WindowsPrincipal.AuthenticationType
= NTLM
Secured Socket Layer (SSL)
All Windows Authentications and other authentications, unless manually encrypted, all transmit user credentials unencrypted. They must be used on top of Secured Socket Layer (SSL) to maintain the data integrity and privacy. To learn more details about SSL, see my article “Secured Socket Layer (SSL) – Basic & Practical”.
Conclusion
There are two types of authentications: Windows authentication, including basic, digest and Windows integrated authentication, and authentication that does not rely on Windows security, which is forms authentication. The first one saves application developer the hassle to verify user identity, while the second one is more flexible and scalable.
When clients are across the Internet, authentication has to be done through a secured channel. This is normally provided by Secured Socket Layer (SSL).